An outdoor living project can be a significant investment for a homeowner. To commit to that level of expenditure, the homeowner must possess a strong desire to live in that space. Quality photos of your workmanship can often be the key to creating that needed level of desire, as well as confidence in your ability to bring their vision to life. Although professional photography may render optimum results, that option can often be cost-prohibitive. But by following these simple tips, you can vastly improve your own photography skills, particularly for use with social media marketing.
TIP #1 – Pay attention to what should NOT be in the frame.
One of the biggest mistakes that contractors make is to leave construction debris in the background. Remove all flags, tools, hoses, vehicles, boxes, garbage cans…anything that takes away from the scene. Also, be sure and remove any dirt and leaves from the area to be photographed.
TIP #2 – “Style” your photos.
Don’t take a photo of an empty patio. Although that type of photo will show off the workmanship of the installation techniques, it will do nothing to create desire to live in that space. What the space needs is lifestyle elements – furniture, food, a book with reading glasses, a glass of wine, potted plants, fire. Lifestyle props and elements will help homeowners picture how they will live in that space. Consider partnering with a local home furnishing store and give their company “styling” credit in your photos in exchange for loaning you items from their store or helping you style the scenes.
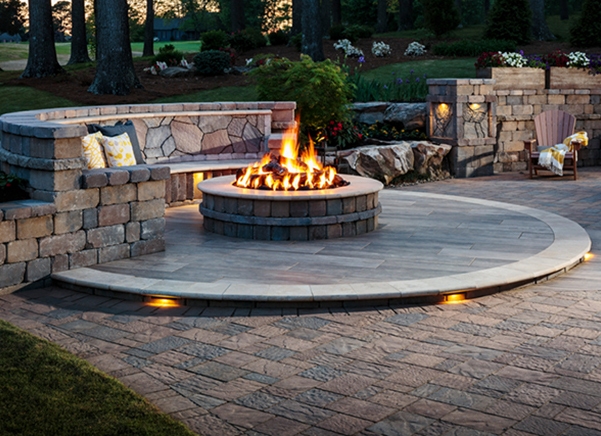
TIP #3 – Time of day can be critical.
Shadows can be your enemy, particularly if they obscure elements of your design. Pay attention to what will cast shadows at various times of day and choose your photo shoot time wisely. Quite often, the best time to take project photos is very early in the morning or near dusk. The additional benefit of near-dusk photography is that you can turn on light fixtures and landscape lights to create additional ambience.
TIP #4 – Consider wetting the pavers.
If the pavers haven’t been sealed yet, you can make the color show up more vibrantly in photos by hosing the hardscapes down using the sprayer setting prior to snapping your shots. If it’s a hot day, keep the hose handy because you may need to keep applying water for a consistent look. Be careful not to overspray or create pools of water.
TIP #5 – Try a variety of angles.
Don’t just take a bunch of wide shots of the entire space. You want to be able to showcase various aspects of your design. Get some close-up from different viewpoints. Shoot one from a high angle, looking down. Get low to the ground and shoot at an upward angle. Try one from a side angle with the main feature off center. Once you start experimenting with different viewpoints, you’ll quickly get a feel for what gets interesting results.
TIP #6 – Simple photo editing can go a long way.
Don’t feel like you need to venture into the complex world of PhotoShop. And don’t go crazy with the InstaGram filters. You want your photos to look realistic, and many programs and apps that use filters will over-adjust the colors in the image, especially if you’re a novice. But you can often vastly improve the aesthetic quality of a photo by simply cropping it a little differently, or by gently adjusting the exposure. Feel free to experiment, but keep your original images in case something goes wrong.