- Driveways
- |
- Outdoor Living
- |
- Patios
- |
- Pool Decks
- |
- Walkways
Paver Rehab Project: Phase 1 – Rejointing Concrete Pavers
Louisiana weather can be brutal on an outdoor living space. Blazing summer suns fade everything, year-round humidity promotes mold and mildew growth, and the shear volume of annual rainfall can create erosion issues. And don’t get me started on how well weeds thrive in this environment. In 2011, our family embarked on a Belgard outdoor living makeover that included two paver patios, a paver walkway and an outdoor kitchen and bar. It was quite the transformation. (click here to check it out)
Learning from our mistakes.
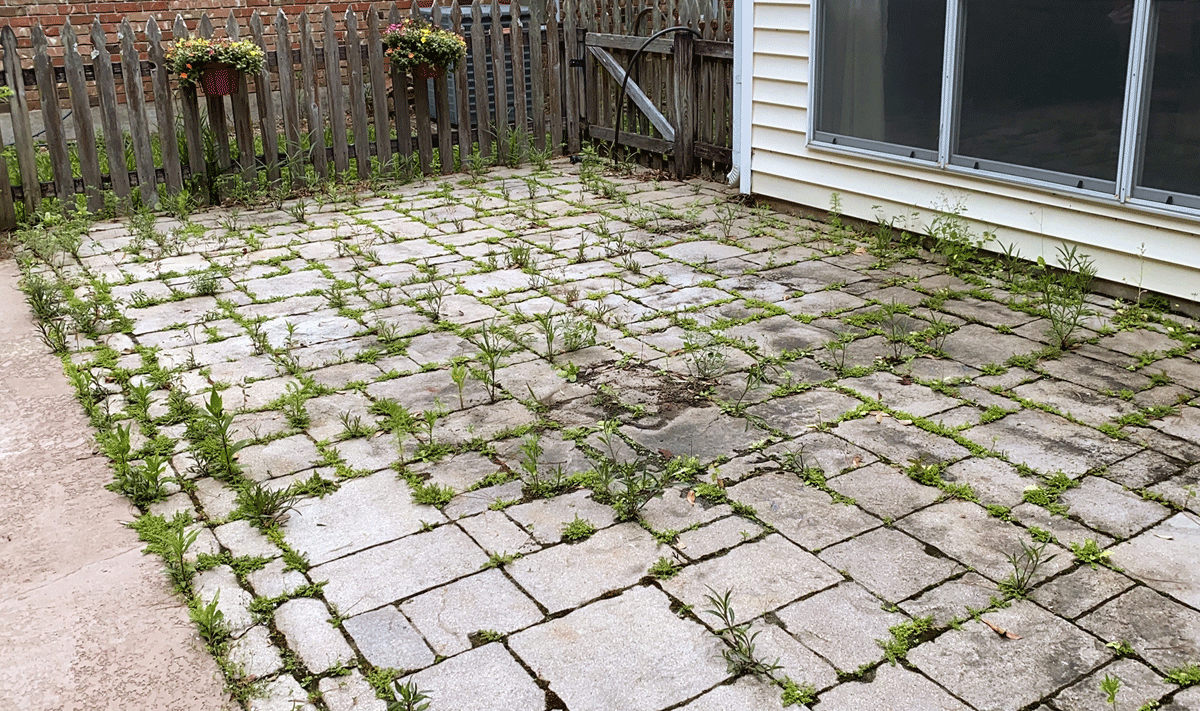
Sadly, we made the mistake of not initially protecting our installations with paver sealant, which would have provided more protection for both the pavers and the joints. The second mistake was made a couple of years later. We hired someone to pressure wash the house and did not monitor his work. He thought he would help us out by pressure washing our moldy pavers for no extra charge. Although a kind thought, the high PSI stripped some of the finish off of the pavers and removed a lot of the jointing material. Frequent rains pushed dirt into the paver joints and created the perfect spot for a not-so-lovely weed garden.
Around six or seven years ago, we attempted to fix it by buying some jointing material and sealant from one of the local big box stores. At the time, Techniseal® jointing and sealing products were not available for retail purchase in our area, so we settled for lesser quality products. The moral of this story…don’t settle. We wasted a lot of time and money for the weeds to all grow back six months later. For the last several years, we just kept battling weeds — mowing them, spraying them, pulling them, cursing at them. Nothing worked.
This time, we used Techniseal® and did it right! Get a glimpse at the transformation below. Crazy, right?!

How did we fix our paver joints?
Techniseal is one of Belgard’s sister companies, so I reached out for some professional advice. I’d like to give a special shout out to the local Techniseal rep, Chris Callahan, who actually came to my house to see the grand mess in person. He talked me through the step-by-step instructions on how to fix my paver joints, which you’ll find below. One of the best tips that he gave me was to use a pressure washer to remove the joints, which saved a TON of time. Last time, we dug them all out by hand, which took us about two days and resulted in me needing a massage therapist. Keep in mind, I was skeptical. We’d already had an issue with a power washer stripping the finish off of our pavers. But he told me the RIGHT way to do it — rotating tip, low PSI, aimed in the joints only. I own a small lightweight power washer that was perfect for the job. It didn’t have an actual rotating tip, but did have a similar setting and the PSI was only 1300, which was perfect. We didn’t mar the pavers at all!
Stocking up on the right tools.
The tools needed to rejoint pavers are not hard to find. Whatever you don’t own already can easily be purchased or rented from a local hardware store. We actually had most of this on hand in our shed.
- Light duty pressure washer with rotating tip
- Leaf blower
- Push broom
- Hand tamper
- Small vibratory plate compactor (optional) with rubber pad
- Water hose (long enough for entire paver field)
- Pistol grip hose nozzle with a shower setting
The only item we had trouble finding for rent was the rubber pad for the plate compactor. Using a compactor without a rubber pad can chip or crack pavers. We could have purchased a rubber pad and just rented the compactor, but our patios and walkway were small enough to tamp by hand, so we went that route.
The right jointing material is crucial.
The only materials needed are the jointing sand and water. The best jointing sand that you can use is professional grade Techniseal® HP NextGel™. I’ve been told by numerous contractors that it’s the easiest to use, compacts nicely, leaves the least amount of haze and provides the best long-term performance. Because it’s professional grade, it’s only available through specific dealers. Click here to find a dealer. Sakrete® PermaSand is a residential grade jointing sand that you can find at local big box hardware stores. It doesn’t have some of the high-performance benefits of NextGel, but will do the job nicely.
- IMPORTANT NOTE: Quantity of jointing sand will depend on the thickness of the pavers. Be sure to read the packaging thoroughly in terms of square footage coverage and activation procedures.
We fortunately have a NextGel dealer nearby (shout out to CD Enterprise Products). I have to say that I was thoroughly impressed by NextGel. I could immediately tell by the texture and workability of the dry product that it was FAR more superior to the jointing material we used last time. That initial impression was confirmed after we installed and activated it.
Paver rejointing in action.
We had a little fun with our project by making a short video illustrating the steps. Check it out.
Step-by-step instructions on how to rejoint pavers.
Step 1 – Remove existing joint material
In order to get the new jointing sand to bond correctly, you’ll need to remove 1.5 inches of the existing material from between paver joints. Otherwise, you’ll end up with a “capping” effect that will not create a stable bond.
- IMPORTANT NOTE: The rotating tip is important. A fan tip can mar the finish of the pavers. The rotating tip will help prevent marring and will also help throw the sand out of the joint. Do not remove the entire joint down to the bedding layer, which could affect the stability of your paver system.
Step 2 – Remove debris from the paver field
Allow the removed material to dry so all debris can be more easily removed from the paver field with a power blower. Check to make sure material didn’t refill the joints.
- IMPORTANT NOTE: Allow pavers to completely dry before moving on.
Step 3 – Stage bags of jointing sand
Place bags of jointing sand at various staging spots around the paver field according to the square footage coverage noted on the product packaging.
- IMPORTANT NOTE: Staging in sections will prevent the need to push the product long distances while dispersing, which could cause the aggregates and binding agents to separate and provide inconsistent bonding.
Step 4 – Disperse jointing sand
Slice bags open, empty onto paver field and push into the joints with a push broom.
Step 5 – Compact sand into joints
Use a hand tamper along the borders and a plate compactor on the main paver field to compact sand into the joints and remove any air pockets. Run the compactor over the paver field only once, slightly overlapping the previous path with each pass. The entire job can be done with a hand tamper, but it’s more laborious.
- IMPORTANT NOTE: Running a plate compactor within 2 feet of a house, concrete curbing or retaining wall can cause structural damage. It’s important to use a hand tamper in those areas. Also, be sure to use the rubber pad attachment to avoid marring the surface of the pavers.
Step 6 – Top off joints where needed
Once the joints settle, more sand may be needed in some places. Inspect the entire paver field to ensure that all joints are sanded properly, with sand level falling 1/8 inch below the paver edge.
Step 7 – Blow off excess sand
Hold the blower about 1.5 feet above the paver surface to avoid blowing the sand out of the paver joints. You just want to remove excess sand from the surface of the pavers.
- IMPORTANT NOTE: Be sure to wear a dust mask for safety.
Step 8 – Activate jointing sand
Using the shower setting on your pistol grip nozzle, start at the bottom of the grade (the lowest point, where the water drains towards). Spray for 15 seconds per 200 square feet. Go back to the beginning and spray each 200 square foot section for 30 seconds.
- IMPORTANT NOTE: This is the activation directions for HP NextGel. Be sure to read the packaging of the brand you purchase, in case the wetting times differ.
Step 9 – Remove excess water
Holding the leaf blower 6 inches above the paver surface, blow any standing water off of the paver surface.
- IMPORTANT NOTE: Allow 24 hours to dry (up to 48 hours if temperature is below 65° F) before placing furniture or allowing foot traffic. Allow at least 30 days to cure before cleaning or sealing pavers.
Next phase: cleaning and sealing.
Once our paver joints properly cure (30-60 days), we’ll clean them to remove dirt, oil, mold and other stains. Then, we’ll properly seal them with high-quality Techniseal sealant. Stay tuned!