As the saying goes, if you want something to last, be sure to start with a solid foundation. This definitely holds true for when installing a paver base for your project.
Using the proper base materials and installation approach is critical for a strong paver patio, walkway, or driveway. We’ve all seen paver installations that are uneven and cracking. In most cases, the fault lies with an improperly installed base. Although soil conditions and terrain can certainly be a factor, the information below can help those do-it-yourselfers undergo concrete and porcelain paver installations that remain beautiful for years to come.
Standard Concrete Paver Base Installation
Step 1 – Excavation
Excavate all the topsoil off the area where the project will be installed. It’s imperative to dig down to the clay or subsoil. If the subsoil in your project area has recently been filled (i.e. as a result of new construction), it’s a good idea to compact it with a large walk-behind compactor before adding the gravel around the paver base.
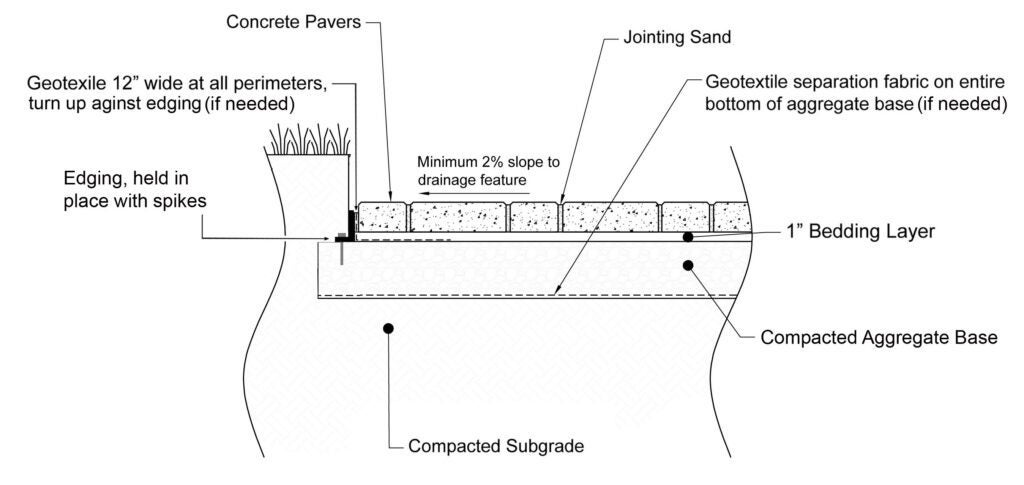
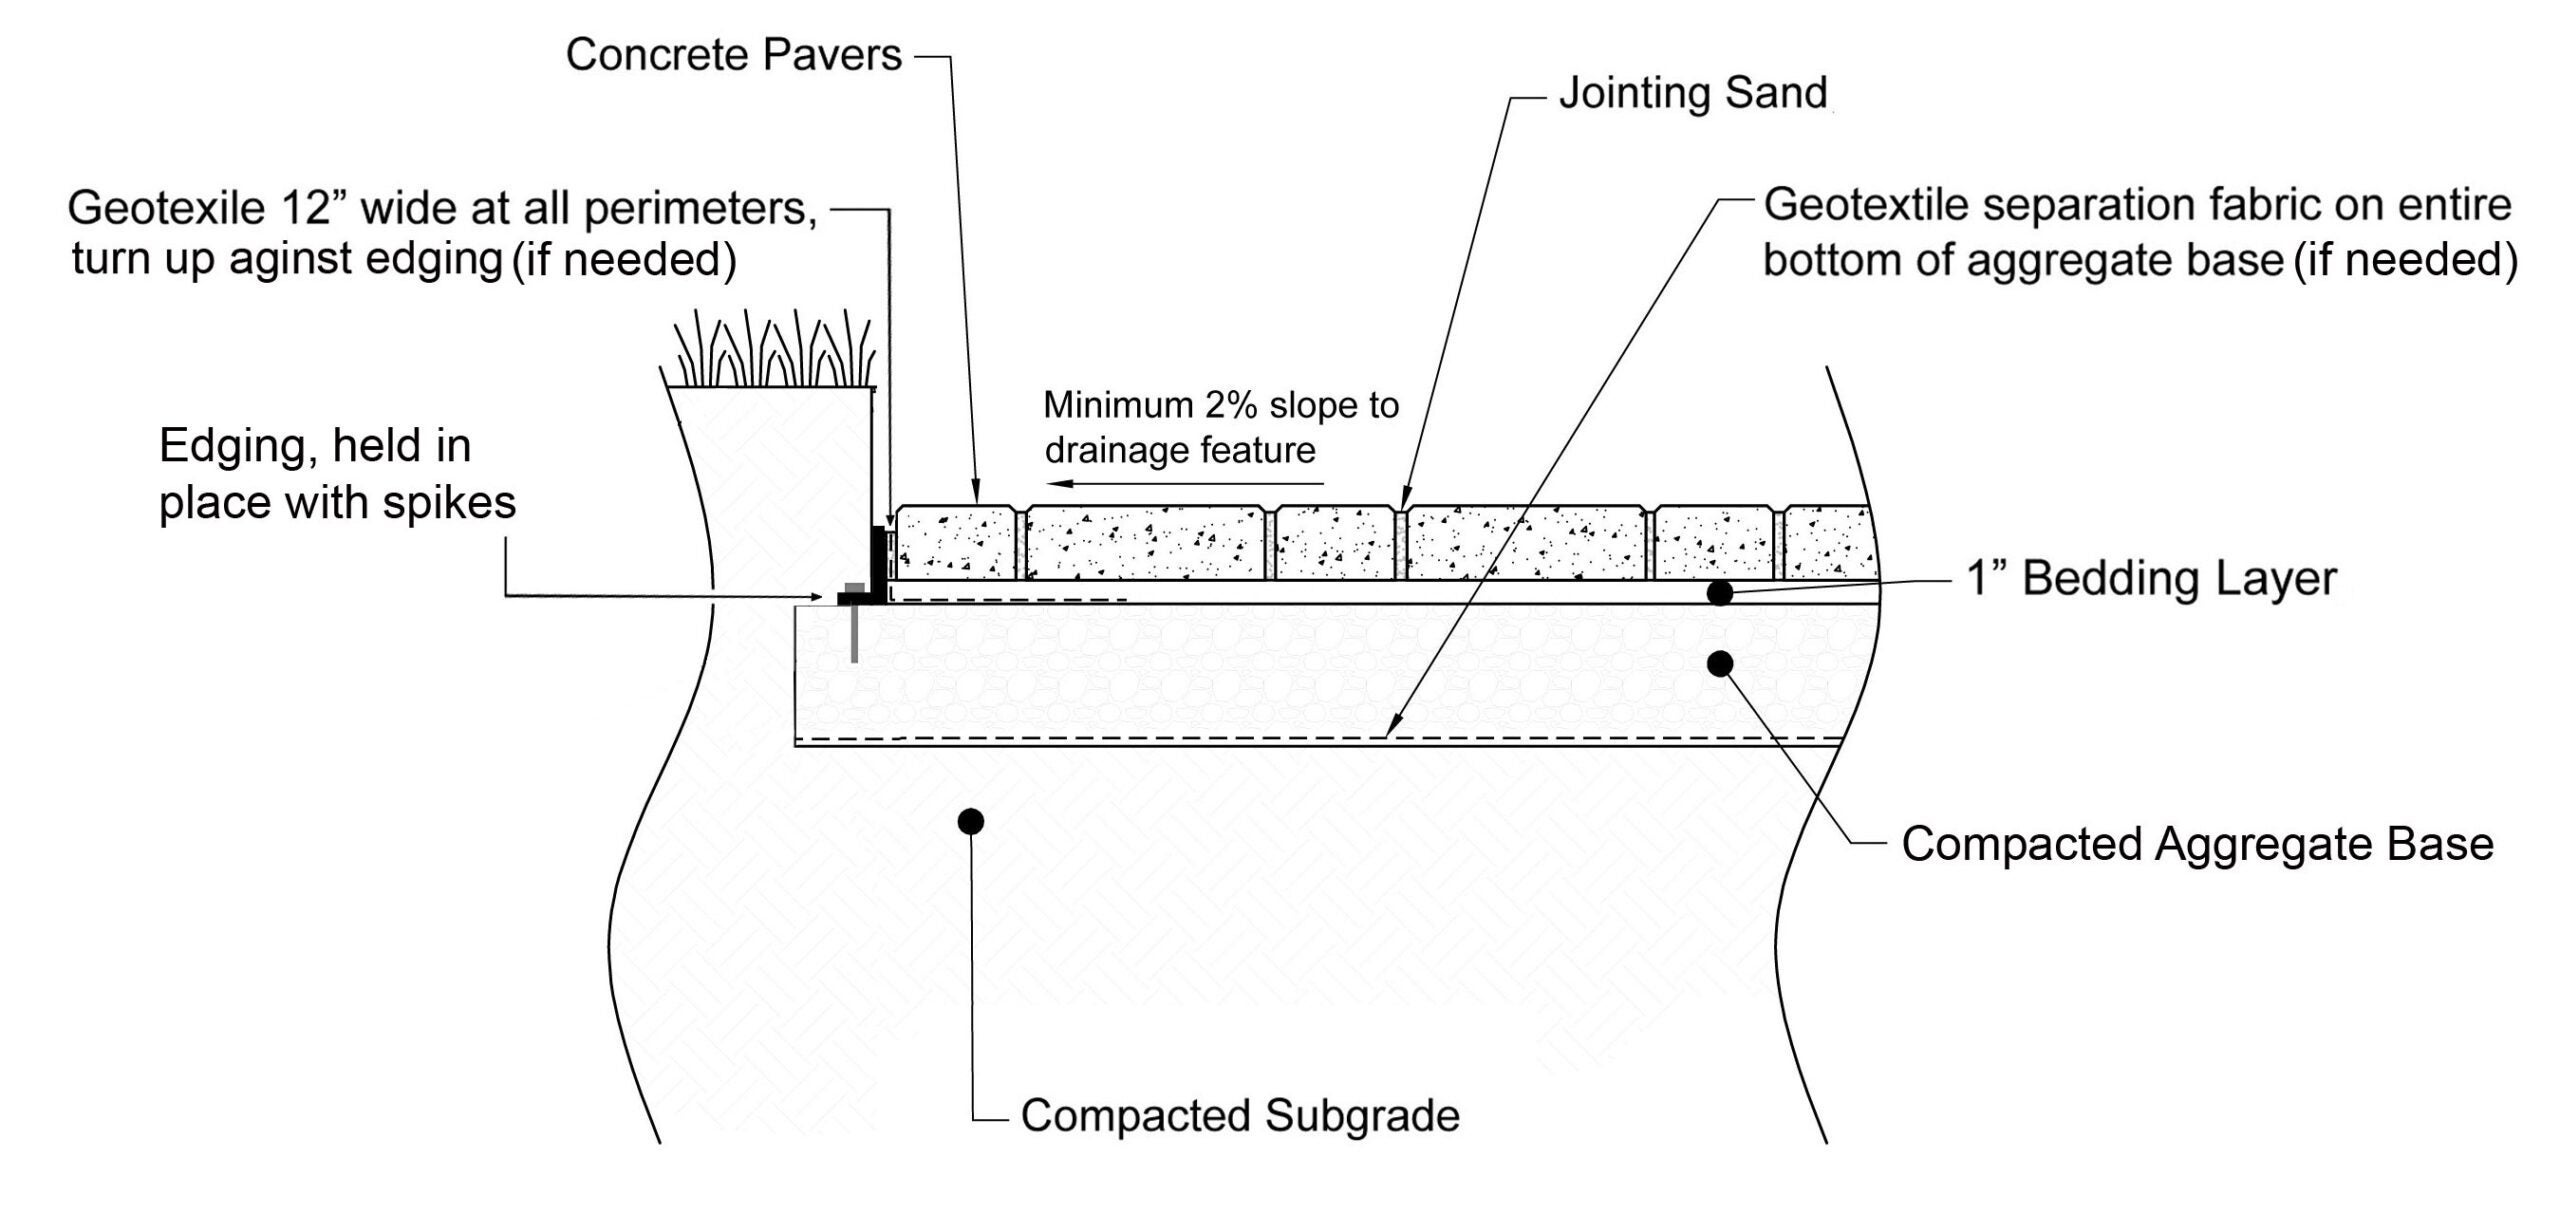
Otherwise, if it hasn’t recently been filled or disturbed, you can begin adding the aggregate base layer. When calculating the depth of the excavation, you will need to add the thickness of the paver itself, 1” of bedding sand, and the necessary gravel recommended for the type of project you are installing.
Step 2 – Aggregate Base Layer
Typically, the material used for this aggregate base consists of crushed gravel that will vary in size from 3/4” down to dust. For walkways and patios, you will need to add 4-6” of this material. For driveways, you will add 8-12”. If you have heavy clay subsoil, it’s also a good idea to add a geotextile underlayment. This woven layer of fabric will prevent aggregate from mixing with the soil below. This is especially important in driveway applications.
In colder climates, it may be necessary to add more aggregate base material to allow for the freeze/thaw conditions present there. It doesn’t hurt to add more base material if you are unsure. Once the base material has been placed, you will want to rake it off evenly. It’s critical at this phase that the gravel be pitched away from the house to allow for water runoff. Typically that slope will be between 1/8” and 1/4” of drop per linear foot (or more for driveways, depending on the location).
Step 3 – Compaction
For this, you will need to rent a plate compactor with a minimum of 5,000 lbs. of force. Most local rental companies will carry this piece of equipment. Ideally you will want to compact in lifts (layers of gravel) no greater than 4”-6” at a time. Doing more than that will result in an improperly compacted paver base.
Step 4 – Bedding Layer
Next, you will add and level 1” of bedding sand material to the paver base. The easiest way to level the sand is to purchase two pieces of 1” metal or plastic electrical pipe conduit. Place the two pieces of conduit down, and using a 2 x 4 board, screed the sand smooth. Keep moving the tubes down as you go, making sure to fill the voids where the tubes were by smoothing the surface with a trowel. You are now ready to lay the pavers.
For additional or site-specific design, consult your local Belgard representative or a civil/geotechnical engineer experienced with flexible segmental pavement design.
Overlays – Installing Pavers over Existing Concrete
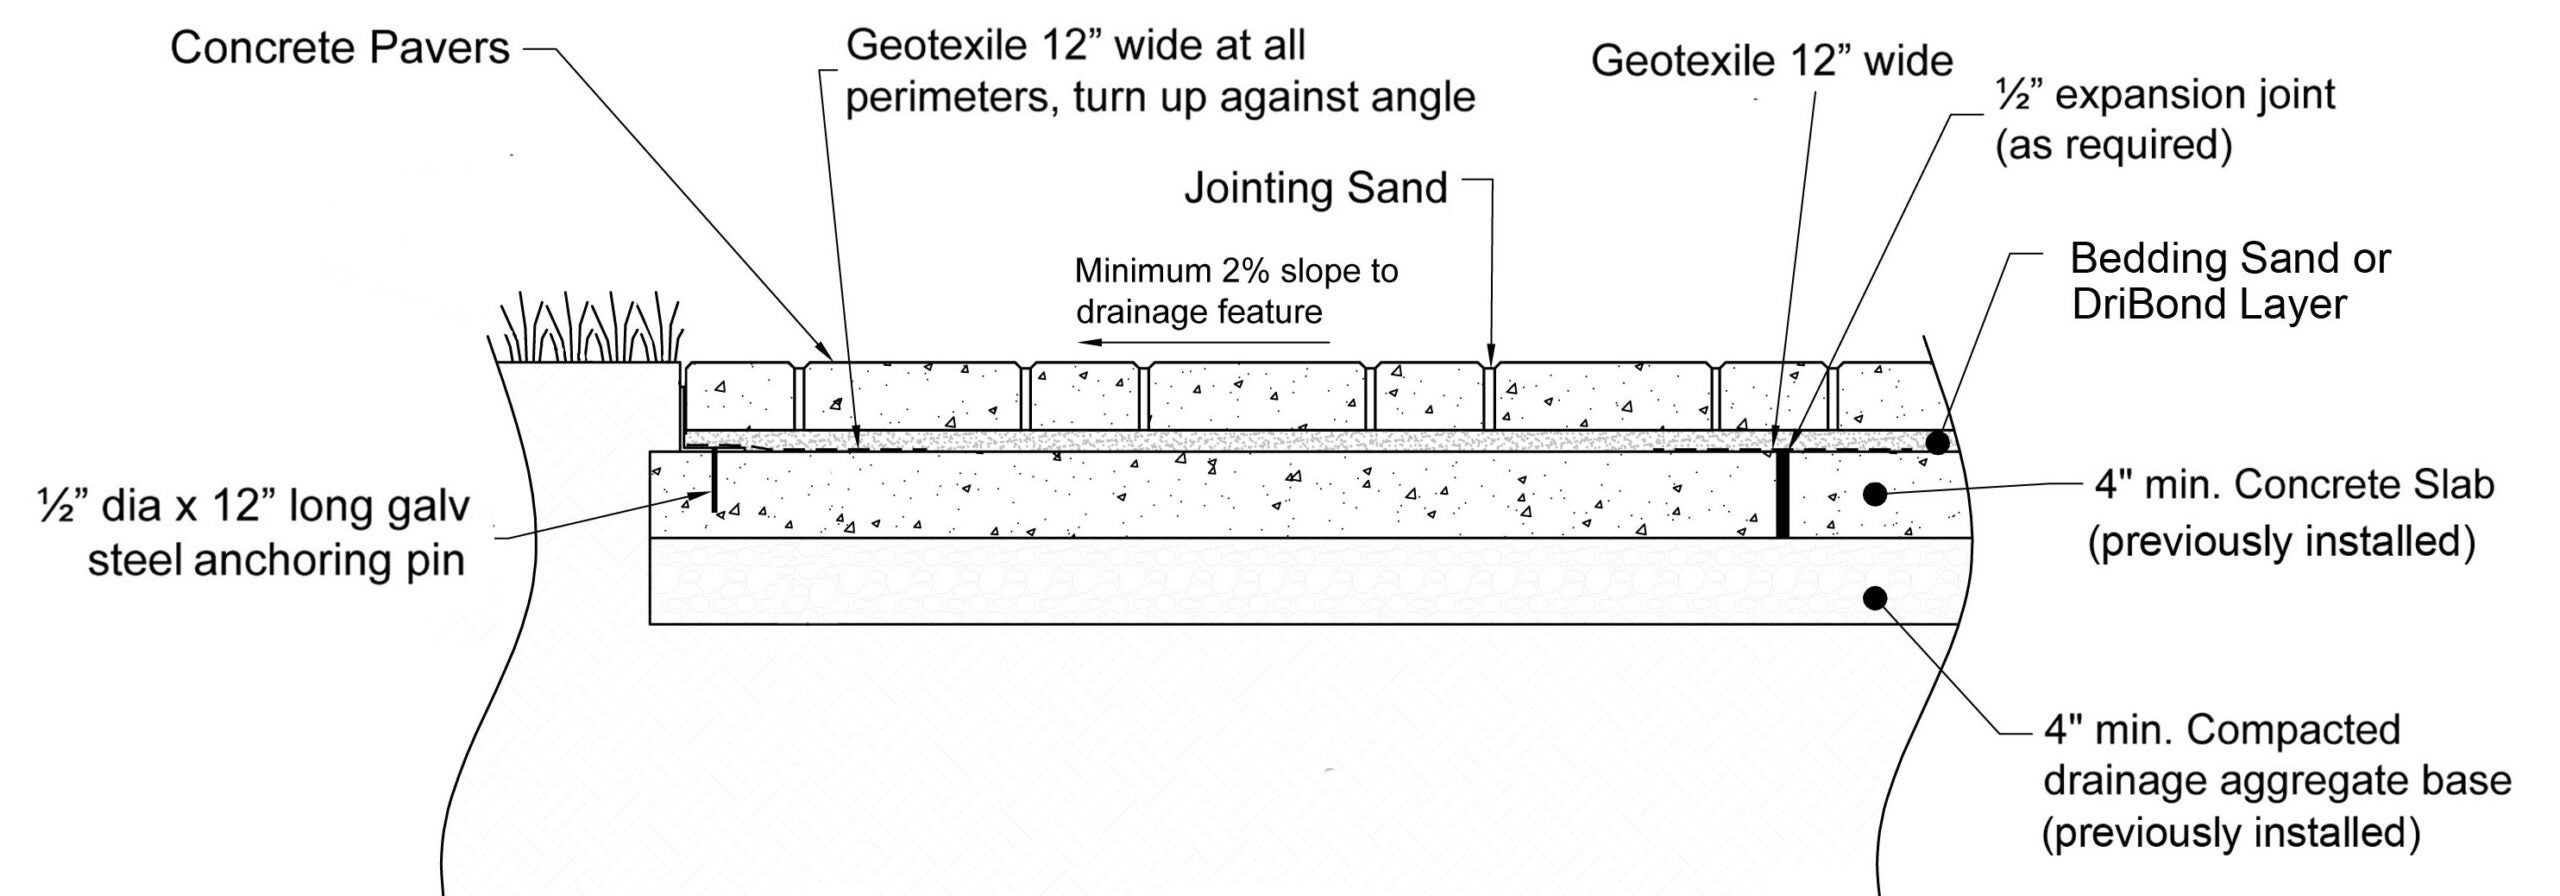
Thin concrete pavers or Belgard Porcelain Pavers may be placed over an existing concrete slab or a new concrete slab (4,000 psi and 4” thickness minimum) on a sand or dry mudset setting bed.
Dry mudset will actually adhere the pavers directly to the concrete slab, similar to how thinset adhesive works for tile. It goes on as a thin dry powder (3/8” thick max). Once the pavers are installed, simply soak the pavers with water to activate it. If just using sand, you will want to install an edging restraint as shown in the above diagram.
Prior to installation, verify that the distance from the top of slab to the doorsill will accommodate the proposed paver and setting bed thickness. If the concrete won’t allow for the thickness of the new overlay material, many rental companies will rent small grinding equipment. As long as you are left with a minimum of 4”, you can remove some of the top layer of the existing concrete. The other option would be to cut and remove the concrete near the transition and re-pour it at a lower height.
If the site is located in a freeze-thaw zone, consider any heave movement in your height calculation. Thickness of the concrete slab should be 4”-6” with consideration given to heavier loading (RV, travel trailers, trucks, etc.) to determine the correct depth of concrete base and any internal reinforcement.
For additional or site-specific design, consult your local Belgard representative or a civil/geotechnical engineer experienced with rigid segmental pavement design.
Optional Bases for Porcelain Pavers
Porcelain pavers have the option to be installed over a standard paver base, permeable base, sand, grass, concrete or pedestals. For additional information on installation of porcelain pavers on these various bases, and for special instructions regarding accommodating vehicular loads, download the Belgard Porcelain Paver Installation Guide.
. . .
