As the saying goes, if you want something to last, be sure to start with a solid foundation. This definitely holds true for when installing a paver base for your project.
Using the proper base materials and installation approach is critical for a strong paver patio, walkway, or driveway. We’ve all seen paver installations that are uneven and cracking. In most cases, the fault lies with an improperly installed base. Although soil conditions and terrain can certainly be a factor, the information below can help those do-it-yourselfers undergo concrete and porcelain paver installations that remain beautiful for years to come.
Standard Concrete Paver Base Installation
Step 1 – Excavation
Excavate all the topsoil off the area where the project will be installed. It’s imperative to dig down to the clay or subsoil. If the subsoil in your project area has recently been filled (i.e. as a result of new construction), it’s a good idea to compact it with a large walk-behind compactor before adding the gravel around the paver base.
Otherwise, if it hasn’t recently been filled or disturbed, you can begin adding the aggregate base layer. When calculating the depth of the excavation, you will need to add the thickness of the paver itself, 1” of bedding sand, and the necessary gravel recommended for the type of project you are installing.
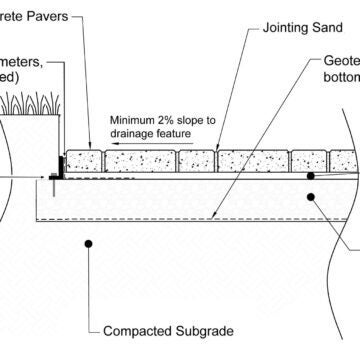
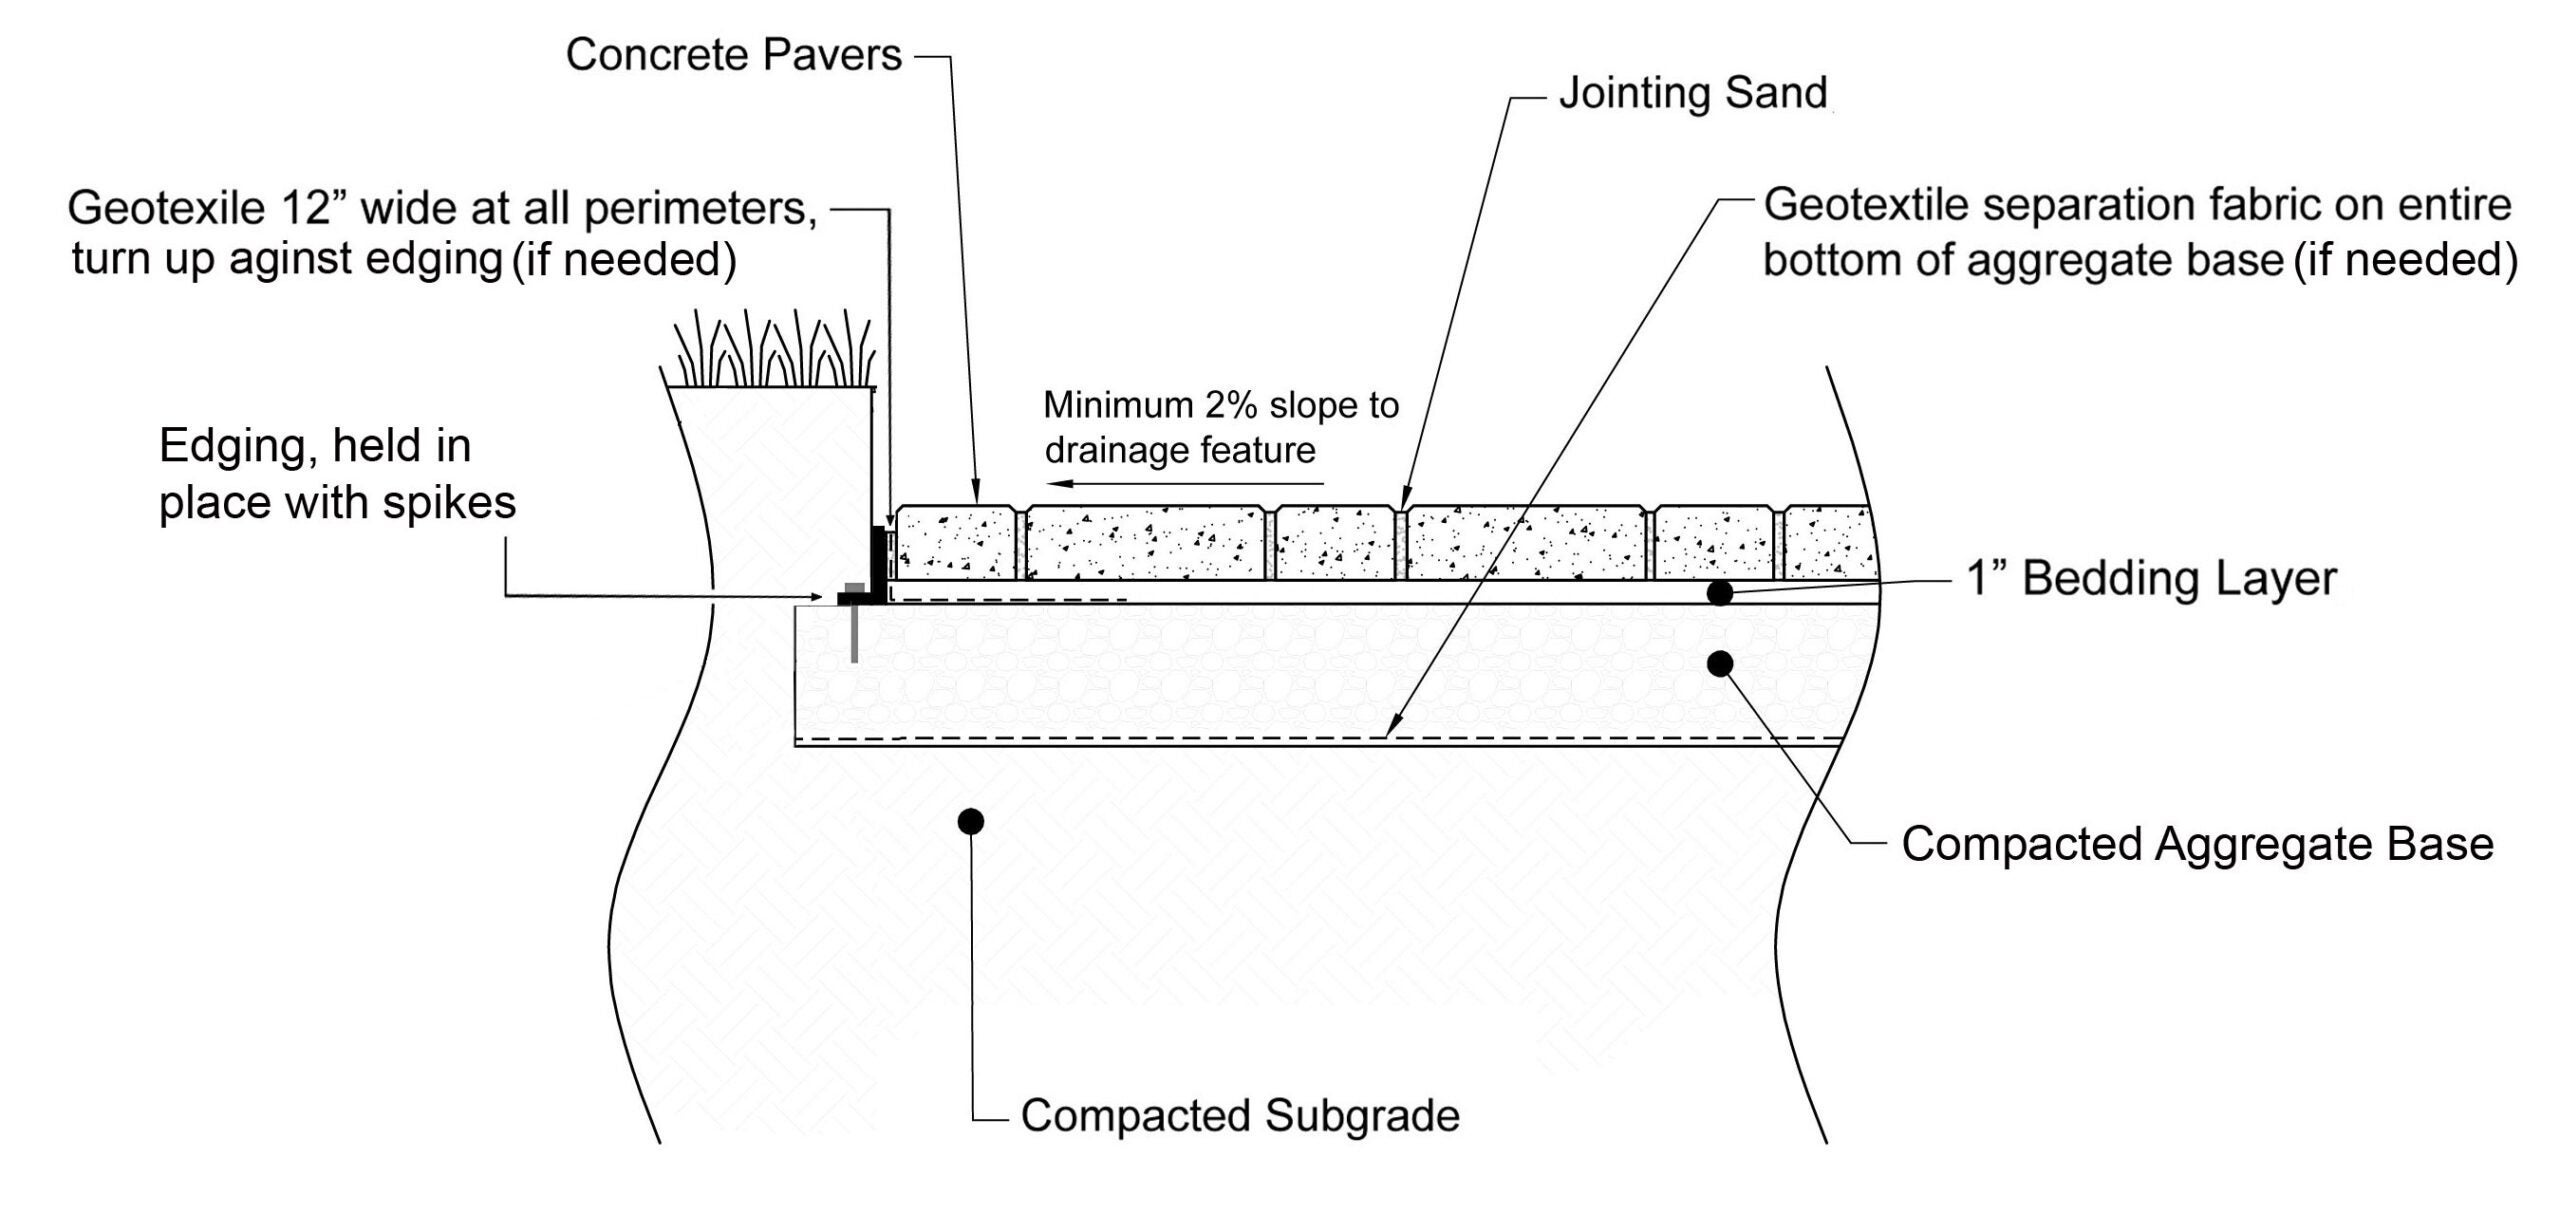
Step 2 – Aggregate Base Layer
Typically, the material used for this aggregate base consists of crushed gravel that will vary in size from 3/4” down to dust. For walkways and patios, you will need to add 4-6” of this material. For driveways, you will add 8-12”. If you have heavy clay subsoil, it’s also a good idea to add a geotextile underlayment. This woven layer of fabric will prevent aggregate from mixing with the soil below. This is especially important in driveway applications.
In colder climates, it may be necessary to add more aggregate base material to allow for the freeze/thaw conditions present there. It doesn’t hurt to add more base material if you are unsure. Once the base material has been placed, you will want to rake it off evenly. It’s critical at this phase that the gravel be pitched away from the house to allow for water runoff. Typically that slope will be between 1/8” and 1/4” of drop per linear foot (or more for driveways, depending on the location).
Step 3 – Compaction
For this, you will need to rent a plate compactor with a minimum of 5,000 lbs. of force. Most local rental companies will carry this piece of equipment. Ideally you will want to compact in lifts (layers of gravel) no greater than 4”-6” at a time. Doing more than that will result in an improperly compacted paver base.
Step 4 – Bedding Layer
Next, you will add and level 1” of bedding sand material to the paver base. The easiest way to level the sand is to purchase two pieces of 1” metal or plastic electrical pipe conduit. Place the two pieces of conduit down, and using a 2 x 4 board, screed the sand smooth. Keep moving the tubes down as you go, making sure to fill the voids where the tubes were by smoothing the surface with a trowel. You are now ready to lay the pavers.
For additional or site-specific design, consult your local Belgard representative or a civil/geotechnical engineer experienced with flexible segmental pavement design.
Overlays – Installing Pavers over Existing Concrete
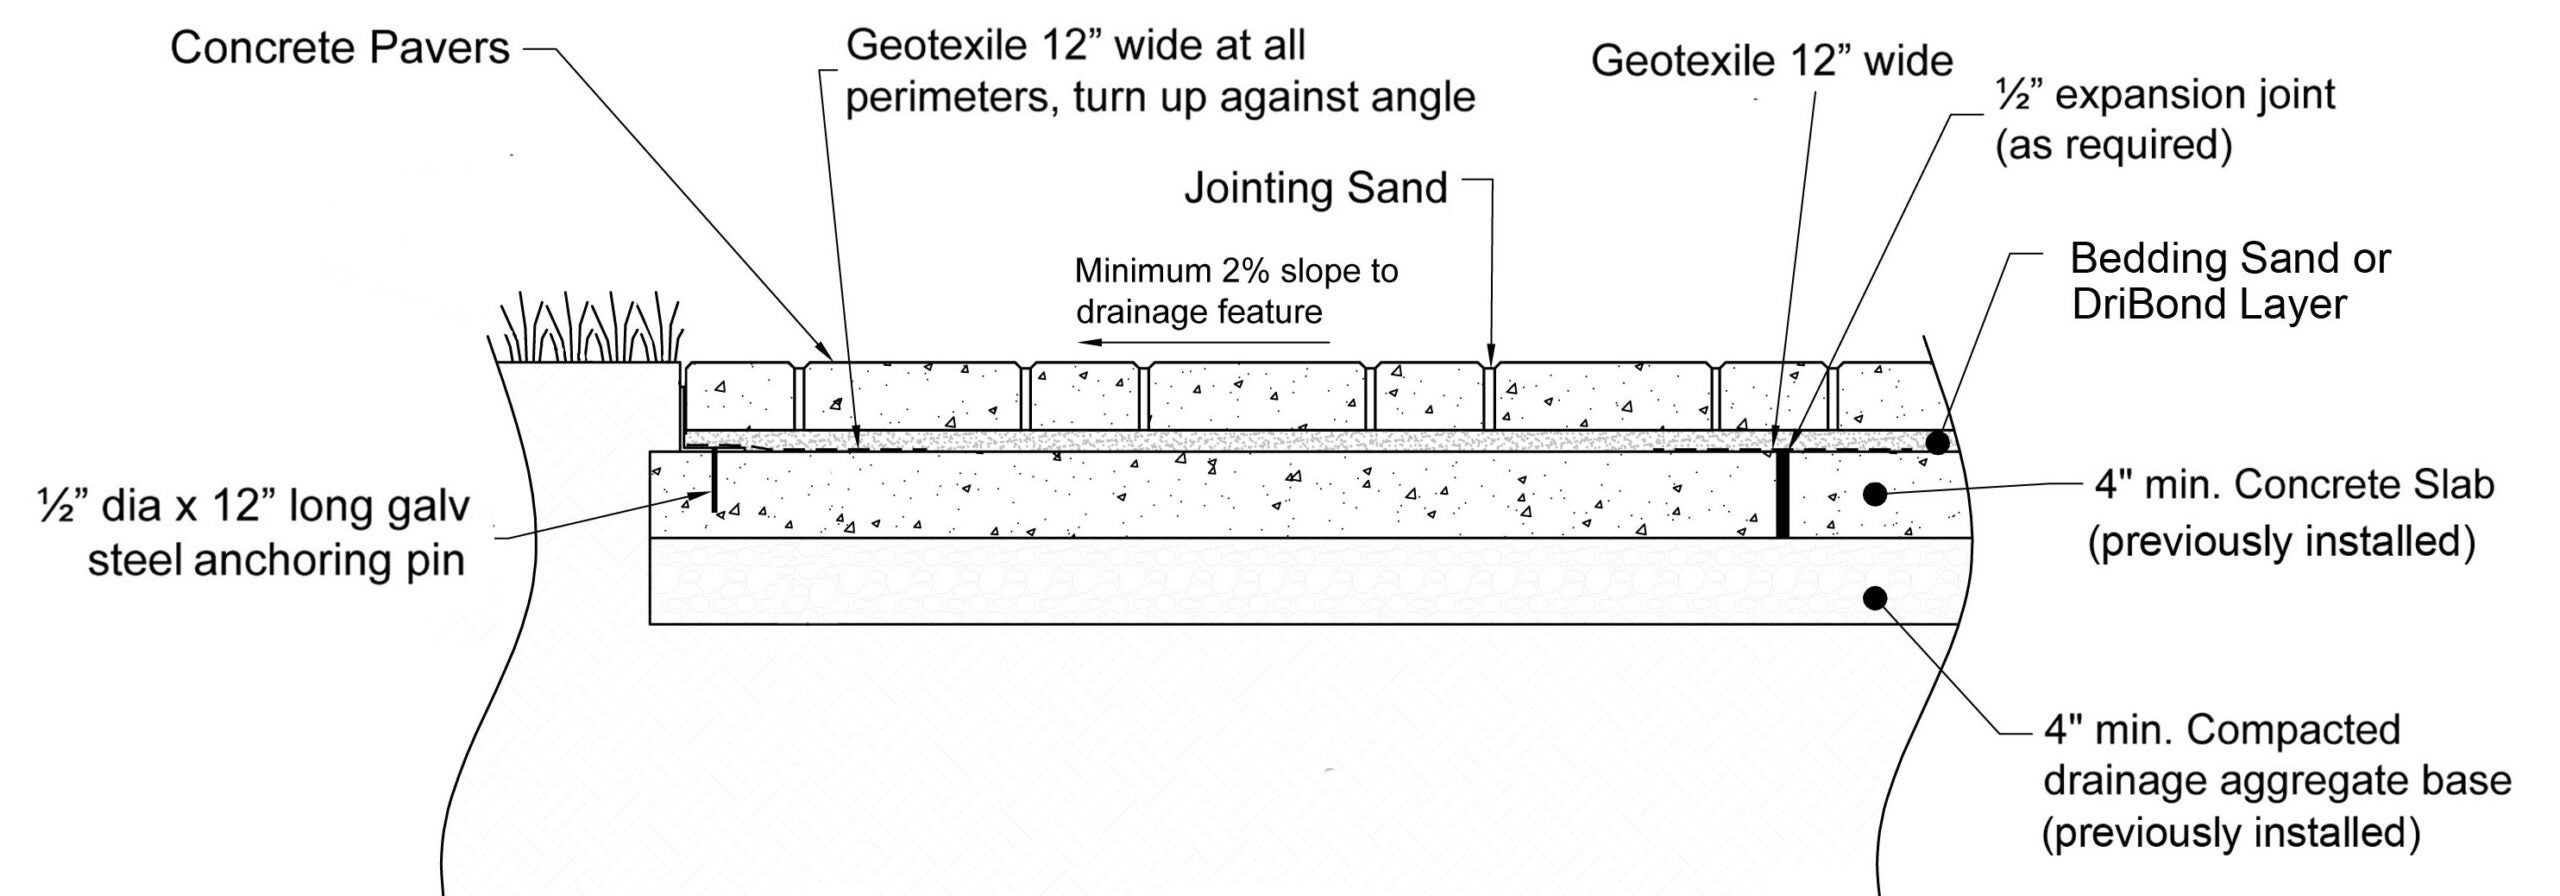
Thin concrete pavers or Belgard Porcelain Pavers may be placed over an existing concrete slab or a new concrete slab (4,000 psi and 4” thickness minimum) on a sand or dry mudset setting bed.
Dry mudset will actually adhere the pavers directly to the concrete slab, similar to how thinset adhesive works for tile. It goes on as a thin dry powder (3/8” thick max). Once the pavers are installed, simply soak the pavers with water to activate it. If just using sand, you will want to install an edging restraint as shown in the above diagram.
Prior to installation, verify that the distance from the top of slab to the doorsill will accommodate the proposed paver and setting bed thickness. If the concrete won’t allow for the thickness of the new overlay material, many rental companies will rent small grinding equipment. As long as you are left with a minimum of 4”, you can remove some of the top layer of the existing concrete. The other option would be to cut and remove the concrete near the transition and re-pour it at a lower height.
If the site is located in a freeze-thaw zone, consider any heave movement in your height calculation. Thickness of the concrete slab should be 4”-6” with consideration given to heavier loading (RV, travel trailers, trucks, etc.) to determine the correct depth of concrete base and any internal reinforcement.
For additional or site-specific design, consult your local Belgard representative or a civil/geotechnical engineer experienced with rigid segmental pavement design.
Optional Bases for Porcelain Pavers
Porcelain pavers have the option to be installed over a standard paver base, permeable base, sand, grass, concrete or pedestals. For additional information on installation of porcelain pavers on these various bases, and for special instructions regarding accommodating vehicular loads, download the Belgard Porcelain Paver Installation Guide.
. . .
47 comments
I have concrete stain on paver how do you remove it.
If you are installing pavers over the concrete slab, you don’t have to worry about removing the stain. But if you are just asking in general about how to remove the color from concrete that has been colored with an acid stain, then this article should help you: How to remove concrete acid stain
Try Techniseal paint tar and rubber remover. Techniseal also has eco stripper for solvent based sealer removal. Should be available where you can buy Belgard Pavers
Thanks for helping me learn more about the base for paver projects. I didn’t know that you need to make sure that the base is compacted properly. I’m interested to learn more about what this compaction looks like when it’s done right compared to one that may not.
You can compact the base with a manual tamper, which can be purchased at a hardware store. This is fine for small projects, but your better bet for large projects would be to rent a plate compactor. To see what the compaction process looks like, click here to see a paver base compaction in process, using a plate compactor.
Any suggestions for building a step with porcelain pavers? My area requires a two-tiered patio. I’m doing a sand over aggregate installation. This is a DIY project and I’m having to deal with former owner shenanigans. 🙂 Thanks!
There are a few different options of how you can handle this.
1) Use the porcelain pavers in a vertical application using an adhesive, like you would with tile, using a butt-joint. Keep in mind, this will leave an unfinished edge. (CLICK TO SEE IMAGE)
2) If you have the skill level, you can miter cut the edge so that it fits together.
3) If the style paver you’re using has a matching UNICO piece, you can butt-joint the Unico with the top step paver, which will give you a bullnose edge. (CLICK TO SEE IMAGE)
4) If you don’t want a bullnose edge, the other side of UNICO is finished, so you can cut the bullnose edge off and butt-joint that side with the top step paver.
Thanks for the response. I’ve decided to go back to the original plan and use concrete pavers. I bought a porcelain tile (not Belgard) to see how durable it was and it shattered when I dropped a hammer on it. I don’t want to have to worry about something being dropped on it. Too bad because I think porcelain tiles are beautiful.
Standard porcelain tiles can definitely be a fragile material for outdoor use. Belgard porcelain pavers are thicker than indoor tiles and significantly more durable. Concrete pavers are also an excellent option. Good luck with your installation!
Do I wet the sand before I tamp
Either with plain or poly sand you will never wet before compaction. Good luck with your project!
Once the pavers are all put down what would you use to fill in the cracks or the edges butted up? We used sand but doesn’t seem to do the job.
Polymeric jointing sand is a better option than standard sand. It is activated with water and includes polymers that harden, but still allow some movement to avoid cracking. It also helps resist bugs and weeds. We recommend Techniseal NextGel jointing sand. The sand should be swept onto dry pavers, compacted down, and then activated with water. To find an installer or dealer for Techniseal products near you, visit their locator page.
Is 4″ of sand to much for standard concrete pavers?
1″ is the maximum recommended. More than that would likely cause trouble down the road.
Can yo tell me what kind of trouble? Sinking and lifting of pavers possibly?
Thank you
Brian
Sinking, shifting, and cracking are all possibilities.
When installing pavers adjacent to poured in place pool coping, do you recommend using a foam expansion joint strip and mastic between the pavers and the outside edge of the pool coping?
As mentioned in the previous comment, Belgard pavers feature interlocking joints that are engineered to allow room for flex so as to not jeopardize the surrounding pavement or structures. For best results, fill joints with a quality polymeric sand like NextGel™ from Techniseal®, which is designed to flexibly stabilize pavers.
If pavers are installed in a location that is constrained by walls on three or four sides, such as a U-shaped front door entry way, do you use foam expansion joint plus mastic along each constrained side?
Belgard pavers feature interlocking joints that are engineered to allow room for flex so as to not jeopardize the surrounding pavement or structures. For best results, fill joints with a quality polymeric sand like NextGel™ from Techniseal®, which is designed to flexibly stabilize pavers.
Can porcelain pavers be installed over existing brick pavers?
Installing pavers over pavers is not a good idea.
Thank you. Can you please elaborate? Why is it not a good idea? What can go wrong?
The base prep for porcelain needs to be perfect. It can either be laid on sand or adhered down to concrete. Although extremely durable if installed with the proper base, if the pavement underneath shifts and there is a point load from something jagged like a brick or a rock, it will crack the porcelain.
I am working on a paver pad and I have the base rock down and compacted. I screed the second layer of base rock before compaction and I have the slope right but there are some areas that are 1/4-3/8″ low. Will the sand fill and level those low spots, or do I need to level the base rock more. Basically, what is the flatness tolerance required on the compacted base rock to result in relatively flat pavers.
Thanks
Awesome question! I will forward this to our installation experts and get an answer asap.
That tolerance is fine provided the overall slope is correct.
Installing 24 x24 pavers in a 300sq ft courtyard. 3 sides are concrete walls but the remaining side is only emclosed by a wooden privacy fence* with 4×4 posts every 4 feet. I want to get pavers as close to fence as possible but am concerned /confused about the edge restraints and possible issues near fence post footings. Was initially going to use edge restraint/spike system but have been urged to use a concrete footings/ edge
Which edge option is best and why?
How to work around fence / fence posts.
Also, distributer recommended bringing tiles to a fabricator for all full lenth cuts. Advised even best wet saw/ skilled installer will struggle to achieve smooth, consistent cuts, especially when a full row of pavers will need to be cut to 10x 24. Any thoughts?
* HOA will not permit even temporary removal of fence without an astronomical fee
In most cases, the edge restraint would be the better option. Poured concrete is an approved ICPI standard for edging except in areas with extreme freeze/thaw conditions, but is not always the best option as it can often crack over time. However, since the edge will be facing the fence, any cracks that happen will likely be out of view. And you shouldn’t have a stability issue with 3 sides abutting concrete walls, especially since you’re using large-format pavers, which are heavier and less likely to shift. Regarding the long cuts, your distributor may be giving you good advice. Definitely confirm your measurements. The space is not likely to be exactly square.
I recently had Belgard pavers installed for a patio and side area. They used polymeric sand. The sand has cracked throughout the patio area. The large cracks start from the house to the end of the patio. I have clay soil. I don’t feel like the contractor prepared the base correctly. What should the contractor do when dealing with clay soil?
Site conditions can affect the required base preparation. If the contractor that you used was an official Belgard Authorized Contractor, the company should offer a minimum 3-year warranty on their work.
if the contractor repairs the cracks, chances are the sand will crack again. What should the contractor have done as a base preparation for clay soil.
This is a tough one. There are many factors to consider when determining how to best prepare the base. Unless it’s a commercial project or a difficult site, most residential contractors are assessing soil conditions visually – which is the standard best practices. The vast majority of the time, following standard ICPI guidelines is fine. Without seeing the project site, a typical residential paver projects will have between 4-8” of crushed ¾ to fine gravel, ½ to 1” of course sand. In some cases contractors will use screenings instead of sand for the bedding layer. If there is concern about the stability of the soil, a geotextile underlayment will be used between the gravel and the compacted subsoil.
As far as polymeric sand goes, there are a ton of manufacturers out there and each one performs differently. It could be that there is an issue with the sand. Regardless it may be worthwhile to find out who’s sand it is. Paver installations are designed to be flexible and so is poly sand. It’s not unusual for poly sand to form cracks, but it’s not a structural issue… and can be addressed in most cases by adding more poly sand.
If anyone wants something to last, be sure to start with a solid foundation. This definitely holds true for when installing a paver base for your project. This article states about Installing the Proper Paver Base for Concrete or Porcelain Pavers. Thanks a lot.
Can i place natural stone /concrete steps over Porcelain paver patio? is there a weight rating for the pavers? I need 2 steps and the steps will be extremely heavy.
Installing a couple steps on top of a slab is possible. However, you would need to completely cut through the concrete where the steps will be placed creating a joint. This would allow that portion of the slab to float independently of the surrounding slab, which will prevent cracking. As always, however, the slab is only as stable as the base below it. If there is shifting, heaving, or settling, it could affect the steps and material above it.
I do not have a concrete base. The layout will be.. soil>3/4 grave>sand>porcelain tile. Can i set concrete / natural stone on top of the porcelain?
We wouldn’t recommend placing steps on top of pavers, tile or porcelain. They need to be laid independently of the surrounding pavements in any situation
I live in California. I am planning to demo all the existing concrete around my pool and put in porcelain pavers. Do you recommend putting in a new concrete slab and then the aggregate base before laying the pavers or is it ok to just do the aggregate base? Also do you recommend grout in between the pavers or is polymeric sand ok?
Was not sure if concrete base and grout were better because of earthquakes.
We recommend aggregate, sand and polymeric sand…so it would be easy to make repairs if you ever need to. Concrete will crack in an earthquake, so it’s better to have a flexible system. Be sure to follow the Mirage install specs and use spacers between the tiles. Installation instructions can be found on all of our porcelain paver product pages.
I am putting in a new paver patio set in sand. I have heavy clay soil and live in a rainy climate. I have found that my contractor has not sloped the subsoil beneath my pavers. They have created a slope of 1 to 1.5 inches per 10 feet by sloping the crushed gravel. How important is it to achieve a slope in the subsoil that goes below pavers and geotextile fabric? I am concerned that if the subsoil below my paver project is flat with zero grade, I could have water collecting underneath the pavers, leading to problems in the future.
It is common that the subsoil doesn’t follow the final slope of the compacted gravel. It’s not an issue, as once it’s complete the water falling on the pavers will flow off, and none will penetrate through the pavers into the base below. As long as this isn’t a permeable installation, everything should work out fine.
Is it normal for the porcelain pavers to shift when temperature changes? I live in California and during winter our newly installed pavers were shifting a lot, then now during summer it’s not happening that much. We care about when temperatures drop again. How can we solve that?
Hi Luiza,
Thank you for your question. Porcelain pavers themselves are very stable and don’t fluctuate based on temps. I would suspect it could have been some initial settling, but from here on out should be pretty stable.
Can I install the 24 x 24 porcelain on a wood porch, sloped, over pressure treated plywood, with Ice and Rain, and then TPO over a double 2×6 one foot on center?
For exterior wood deck applications, we have to possible solutions: Laticrete (over plywood) or StoneDeks (attaching to joists).
Over Plywood
From Laticrete:
Our best and first recommendation would be to follow method ES – F103B (attached) – this method includes a primary roofing membrane that would properly protect the wood framing construct from water damage. Next, our LATICRETE Tile Drain Mat would help to shed water out of the system while isolating the tile setting system from the wood framing. The thick bed mortar system is typically 2” thick before the thickness of the finishes.
The second option would be to an unbonded wire reinforced mortar bed option following the attached installation method ES – F141. Essentially, this method has many of the components of the aforementioned ES – F103B method – without the primary roofing membrane and the LATICRETE Tile Drain Mat – while still isolating the setting system from the wood framing. The thick bed mortar system is typically 2” thick before the thickness of the finishes. It is important to note that in this application the wood framing can be exposed / subject to deterioration over time.
Attaching to joists
From StoneDeks Systems
Deck Remodel Installation Instructions:
https://stonedeks.com/wp-content/uploads/2022/02/Remodel-Instructional-Guide_10_2020.v2.pdf
Installation of Porcelain on a StoneDeck System
https://www.youtube.com/watch?v=8NbZGSCZP4M